
A pipe is a hollow tubular section or cylinder used mainly to convey substances that can flow, such as liquids and gases, and slurries and masses of small solids. It can also serve structural purposes.
When working on a plumbing project, knowing the right size of your pipes is crucial. The wrong diameter can cause costly leaks. Click here at https://www.platinumplumbingsbc.com/ to talk to a professional.

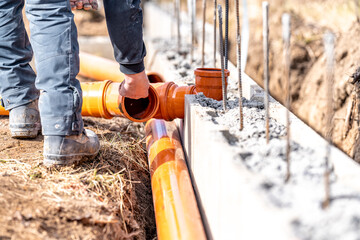
Dig The Trench
A trench is a long, narrow ditch in the ground that has many practical uses. It can be used for plumbing, water drainage, or electricity cabling, among other things. Before digging a trench, it is important to create an in-depth plan for its location. This will ensure that the trench does not interfere with any underground utilities. It is also essential to call a utility location service to mark any buried lines before starting the dig.
Once the trench has been dug, it is essential to minimize side digging for the time being. This will help to preserve the integrity of the existing sewer line. As you dig, make sure that any tree or shrub roots are not invaded. Clip or saw off any heavy roots as you encounter them. You can then place them in yard waste bags for removal later.
The next step is to line the trench with a layer of gravel. This will help with drainage and prevent clogging of the drain pipe. Pour at least 3 or 4 inches of gravel into the trench. Once it has been placed, use a hoe to spread it evenly over the top of the landscape fabric. It is also important to check the pitch of the trench after it has been lined with gravel.
If you are looking to save time and energy, consider hiring a professional to do the digging for you. Taskers will bring professional equipment like trenchers and excavators to get the job done quickly and efficiently. You can also ask them to do trenchless pipe installation if you would prefer that method over digging a traditional trench.
Determine The Length
Having accurate pipe lengths allows for a smooth and efficient piping installation. This is especially true for plumbing systems where water pressure needs to be maximized. Fortunately, calculating the pipe length for fittings is a relatively easy process that can be done quickly and with little effort. The basic steps involve measuring the end-to-end distance of the pipe, determining the pipe size, and calculating the equivalent lengths for the different types of fittings. This helps prevent over-ordering of materials, saves time, and ensures that the piping system is properly installed.
First, determine the diameter of the pipe by using a soft tape measure. For most pipes, the diameter is written on the side of the pipe; for those that aren’t, you can use a micrometer. Open the jaws of the micrometer until they’re slightly wider than the pipe wall, then wrap it around the pipe and read the measurement. If you’re working with threaded pipe, you’ll also need to know the “schedule” of the pipe. This is the thickness of the pipe wall; the most common schedules are 40, 80, and 160.
Finally, if the pipe is female, you’ll need to determine its “closed length.” This is the amount of pipe needed for a hand-fitted seal at the nipple. This can be determined by subtracting the thread engagement from the nipple diameter and using a conversion chart to convert this number to inches.
Calculating the total pipe length after accounting for the equivalent lengths of all the different types of fittings is simple enough, but you should always add a waste allowance. This will give you a little bit of extra pipe to work with in case of any mistakes or other issues.
Cut The Pipes
If you are installing a copper pipe, it is important to know how to cut it correctly. Using the wrong cutting technique can result in your pipe failing prematurely. The most common method for cutting metal pipes is to use a pipe cutter. However, you can also use a hacksaw or a miter saw. Regardless of which method you choose, be sure to wear protective gear and turn off the water valves before beginning. It’s also a good idea to measure and mark the area where you plan on making your cuts. This will help ensure that the cut is accurate and won’t disrupt the flow of water.
After the pipes are cut, you will need to file them smoothly. This step is very important as it will prevent the pipes from leaking in the future. A metal file or sandpaper can be used for this task.
A reducing adapter is another way to join pipes of different sizes. This fitting is shaped like a bell and can fit either inside the larger pipe or on the outside of it. It is a popular alternative to using soldering to connect pipes.
PEX pipe is becoming more and more popular, but PVC, CPVC, and copper still have their uses as well. One reason for this is that these materials are easy to work with, requiring only the use of a wrench or socket to install. They are also easier to handle than galvanized steel and can be bent to go around curves. The downside is that they are more expensive than other materials. However, many people believe that they are worth the extra cost because of their durability.
Attach The Fittings
Pipes must be connected properly to ensure they hold water and are safe to use. Different connections require different techniques, from heat fusion joining methods that need specialized tools to press-on methods for quick, easy installations.
To join copper pipes, for example, you’ll need to solder the joints with flux and soldering equipment. If you’re installing the new system in a place that is already served by existing pipes, shut off the water and make sure your cuts are accurate. Then, dry-fit the tee fittings to see how they will fit with the existing pipes. Cut the new pipe a little longer than you need so that it can be cut to length once the tees are connected.
The most common type of plumbing fitting is the tee, which combines or divides pipe runs and can be made to connect pipes of equal or different diameters. Other types of fittings include elbows, branches, reducers, and wyes, as well as valves that control the flow and pressure of liquids through pipes.
For quick, easy connections, consider using push-fit fittings for both copper and PEX tubing. These fittings grip the pipe with a compression ring that is pre-loaded into the fitting for PEX and CPVC, or that can be installed directly onto the pipe for copper. Use a deburring depth gauge tool to ensure the proper depth for installation of the ring, or measure from the end of the pipe to the manufacturer’s specified distance for each type of tubing.
Another option is Pro-Set fittings, which clamp onto the copper pipe and create a watertight connection with an o-ring inside the stainless steel ring. This method requires the purchase of special tools and plumbing experience but is fast and sturdy.
Test The Water
Once the pipe installation is complete, it needs to be tested for leaks. This can be done with a pressure test. Before proceeding with the test, turn off every water source in your home except for shower faucets. If you have threaded fittings, apply the plumber’s tape over the threads. You should also close any valves that are in use. A pressure gauge with a 3/4-inch nipple and reducer is used for this test. Before beginning the test, pump 5 pounds of air into the pipes and watch the pressure on the gauge. After 15 minutes, check the gauge to see if there are any drops in the readings. If there are, this indicates a water leak in the system.
Leaks in plumbing are most common at joints – any connection between two pipes. This is especially true if the joints are not properly installed or sealed. Leaks in the water system can result in flooding and water damage. Therefore, it is essential that all joints are installed correctly and that they are tight. To test the joints, use a pipe tester or a pressure gauge with a 3/4-inch stub nipple and a reducer. This is a simple process. First, assemble the stub nipple and reducer with the help of a washer, then attach the pressure gauge to it. Next, seal all of the threaded connections with a solvent glue and let it dry as per instructions.
It is important to note that this type of testing is not a substitute for inspection by a local building official. Local codes require that new pipes pass an inspection before drywall or other building materials cover them. The pressure test is the best way to determine if your new plumbing will be able to withstand future water pressure and temperature changes.